|
|
Post by b12rock on May 1, 2014 19:29:59 GMT
Glad to see this progressing so fast, love the bike and nice touch with the seat.
|
|
|
|
Post by strangewayz on May 6, 2014 14:10:23 GMT
Warning proper oldskool backstreet workshop content with super cool kit operated by a human...  Took front end along to see Super Larry, bit of a mix of components as GSXR slingy forks, Hayabusa wheel & yolks made by Sam to match Hayabusa fork centers as I am using a PFM Hayabusa 6 pot brake set up. Firstly I swapped the bearings out from 25mm id to 20mm id so that the 20mm GSXR spindle would work with the wheel, next Super machined a couple of slots in the bottom yolk, one for brake hose & the other for a speedo cable. 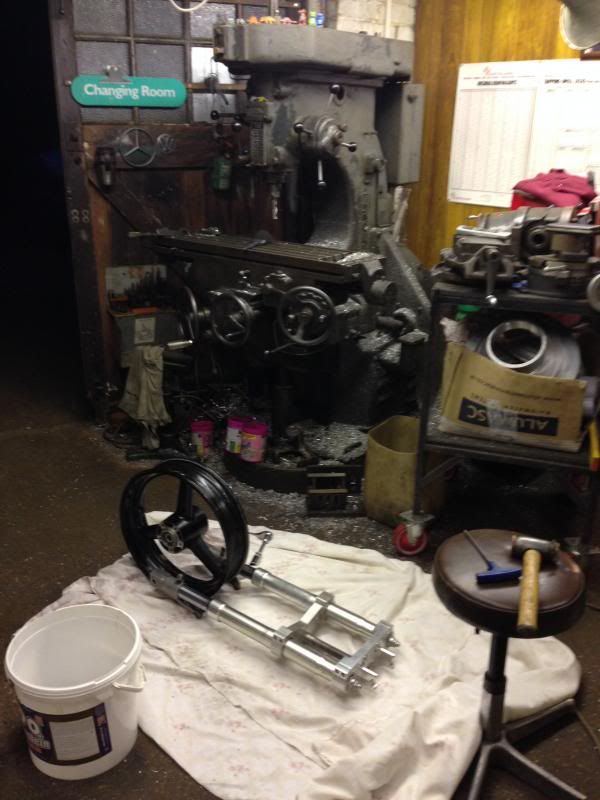 Yeah ok I'm just seeing who's paying attention as Hayabusa front wheels don't have a mechanical speedo drive so what would I be doing with a speedo cable, wanted one as running EFE clocks... After a lot of thought, taking things to pieces I decided that it would work & fit so was time to put my money where my mouth was. Super Larry on camera ! 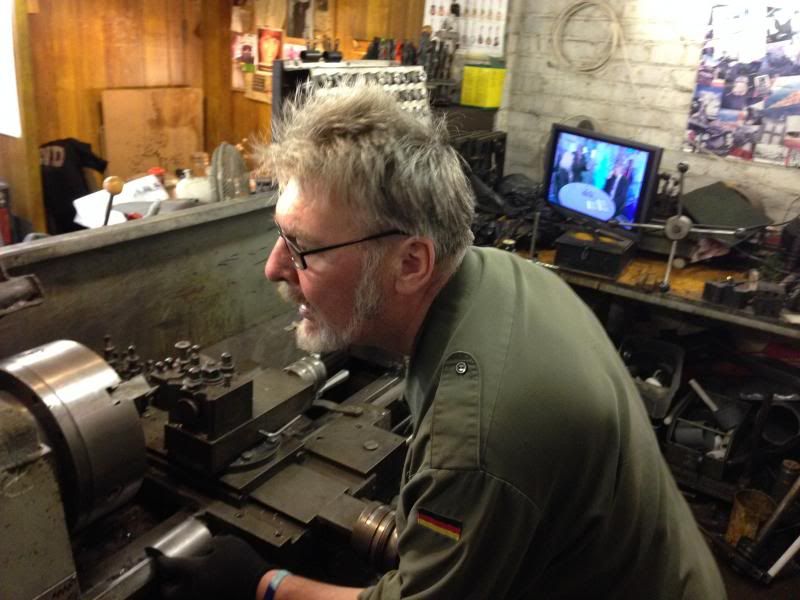 He made a mandrel adapter to hold the speedo drive in his lathe & then started to machine it to my spec. 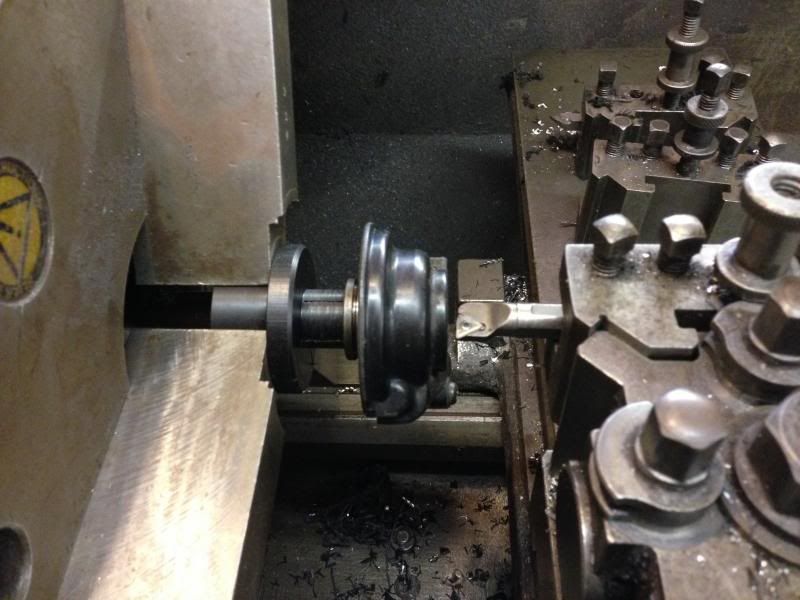 Next up was to notch the wheel to take the GSXR speedo drive ring. 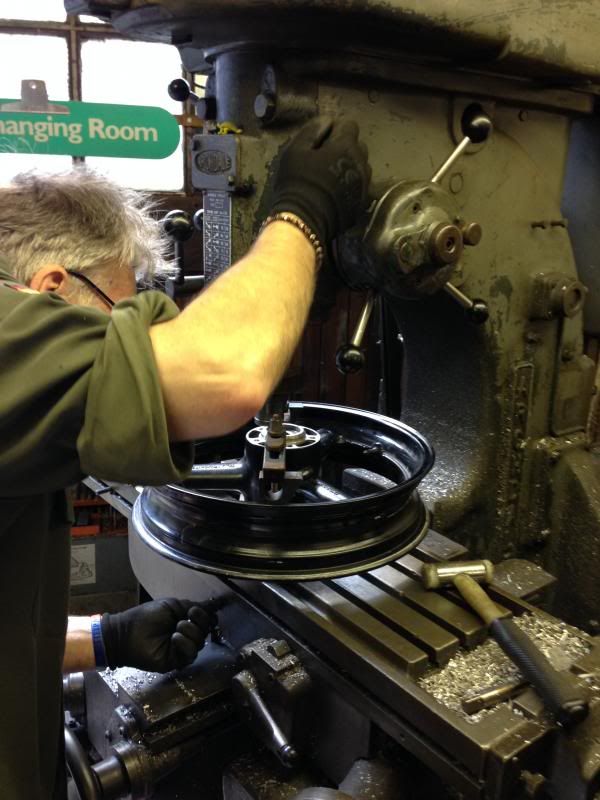 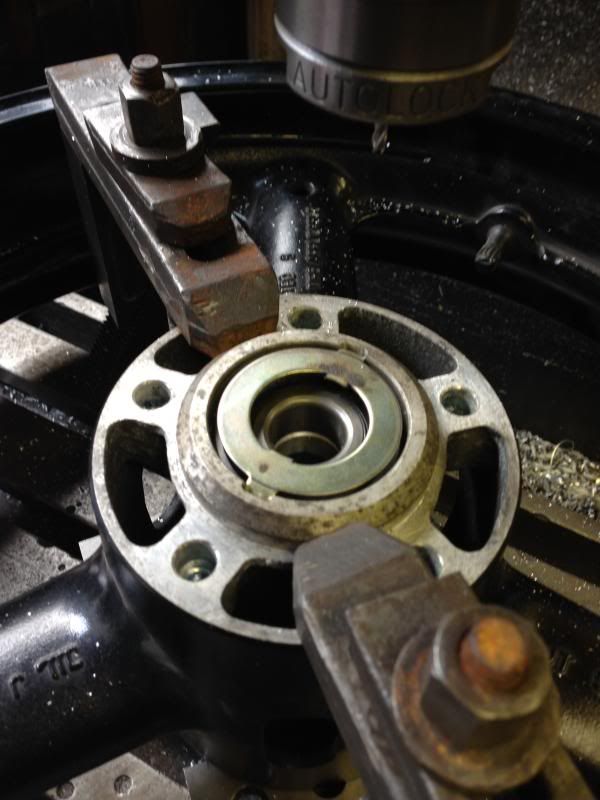 Turning the drive body proved it was engaging as the spout where the cable fitted could be seen turning. 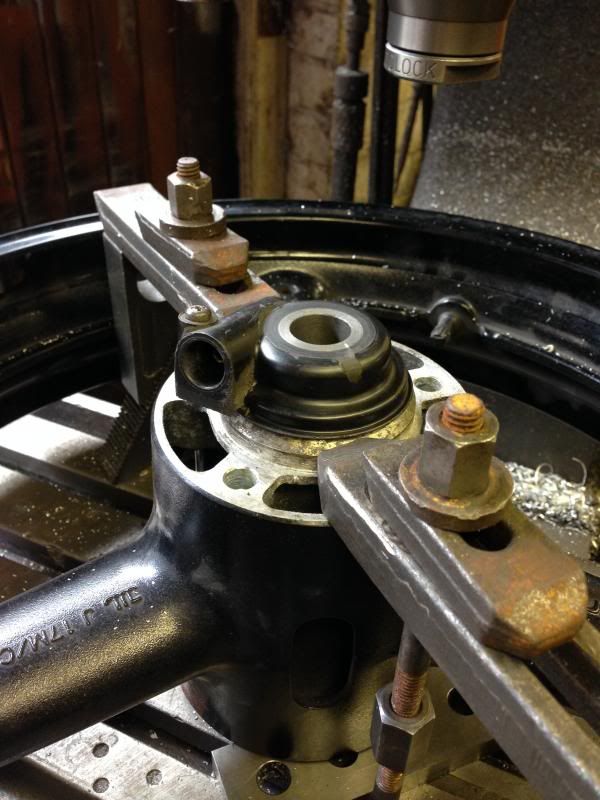 Fork leg next...   Super cool ! 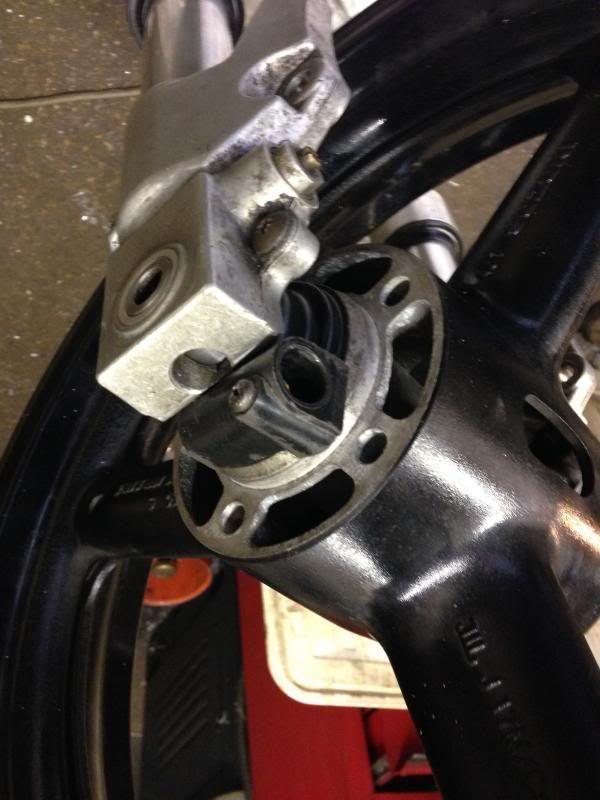 I know a lot of people will say I could have used an electonic speedo but on this build that was one area I did not want to modernise, EFE engine with the EFE clock cluster grafted into the ET headlamp shroud was good enough for me. |
|
|
|
Post by bluedog59 on May 6, 2014 17:21:44 GMT
I always look forward to reading your updates. I love how you will go that extrat bit further to get something just how you want it.  |
|
|
|
Post by strangewayz on May 6, 2014 19:01:43 GMT
I always look forward to reading your updates. I love how you will go that extrat bit further to get something just how you want it. Thanks for saying that ! Woke up this morning thinking 3 weeks to the TT, was that a good use of time... but after a cup of strong coffee it was back to being super cool again  Just got to make everyday count, full time job getting in the way at the moment... dropped some more stuff off with Super today, parts to make an offset front sprocket & seems that the caliper mounting holes on the GSXR forklegs are set out at a slightly smaller radius from the center of the wheel than Haybusa forklegs. So even though the Hayabusa PFM calipers will bolt onto the GSXR forkleg they won't when the disk is fitted, mm out... Super Larry trying to win that without having to use adapter plates. Think I have nailed the chain alignment, big issue has been that with the extensions fitted to the arm when the wheel is forward in the slots all of the chain & rear sprocket is enclosed within the arm... and my chain side pins are very close to the inside of the arm in what is the 3 o'clock position on the rear sprocket. Without extensions that part of the rear sprocket & chain hang out the back of the arm so no problemo...  of course move the sprocket inbound too much & the chain contacts the tyre. |
|
|
|
Post by bluedog59 on May 6, 2014 21:51:03 GMT
Could you take a shave off the inner face of the s/arm ? You should only need a smidge. You could then match the other side so nobody notices and it should be far enough back not to harm the strength.
It's the tiny little detail that one 1 in 50 people notice that make a bike so "right".
..... and the feeling when that one person spots it.
|
|
|
|
Post by busaash on May 7, 2014 7:08:43 GMT
Could you take a shave off the inner face of the s/arm ? You should only need a smidge. You could then match the other side so nobody notices and it should be far enough back not to harm the strength. It's the tiny little detail that one 1 in 50 people notice that make a bike so "right". ..... and the feeling when that one person spots it. +1 the things that take the longest that most never know about , excellent build . and your on target too alan . |
|
|
|
Post by strangewayz on May 7, 2014 17:16:21 GMT
21Everyone likes pictures & projects so to make this more entertaining I'll try & add daily updates so you can share my pain !! with the countdown to the TT.. Someone should run a book I work a full time late shift Mon - Fri so only get to spend a few hours in the mornings on this, I'll throw pics up in the afternoon. Good thinking about shaving some off the inside of the arm, it was something I considered but I think I have it solved. Super Larry has made my offset front sprocket which I will collect from him at 11pm tonight, top bloke letting me do that. Ordered Tsubaki 520 Racing Pro chain which should be here tomorrow, if so I can then do a proper mock up with the actual chain & sprockets I will be using. My brake hoses are being made & sent out by PFM in the Isle of Man today so hopefully with me by the weekend. Above where I said my calipers would not fit by mm I actually meant a few mm's.... the disc hits the back of the caliper & the brake pads hit the disc center before the caliper mounting holes line up with the fork leg, just less than half a hole out. Super is still looking at ways around that, for sure I can use adapter plates but I like things to look like they should fit together & an adapter plate says they did not... Enough talk !! Pictures.. Been trimming the fibreglass seat base, this pic shows how well the build up of cardboard on the petrol tank worked to give Stevea space to put some foam on the inside of this lip. 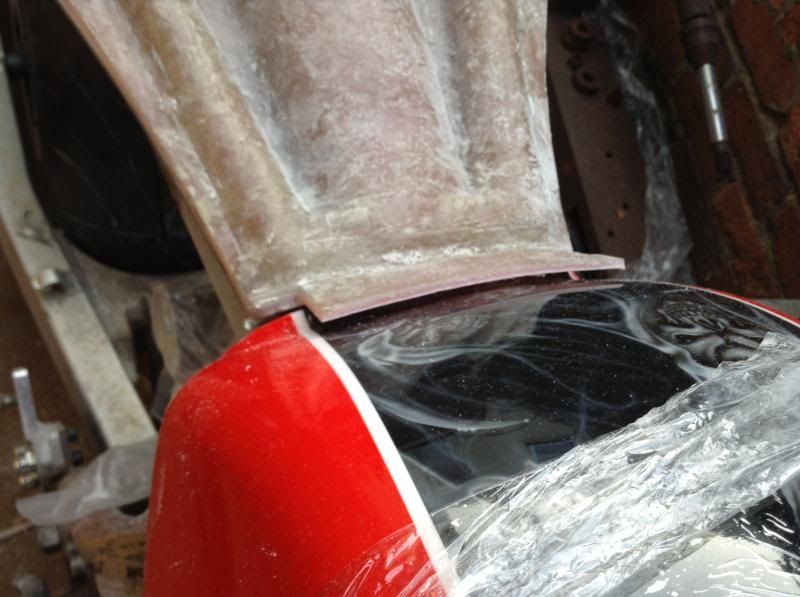 Trimmed the sides & back, you can see the plates that will hold the seat down glassed in. 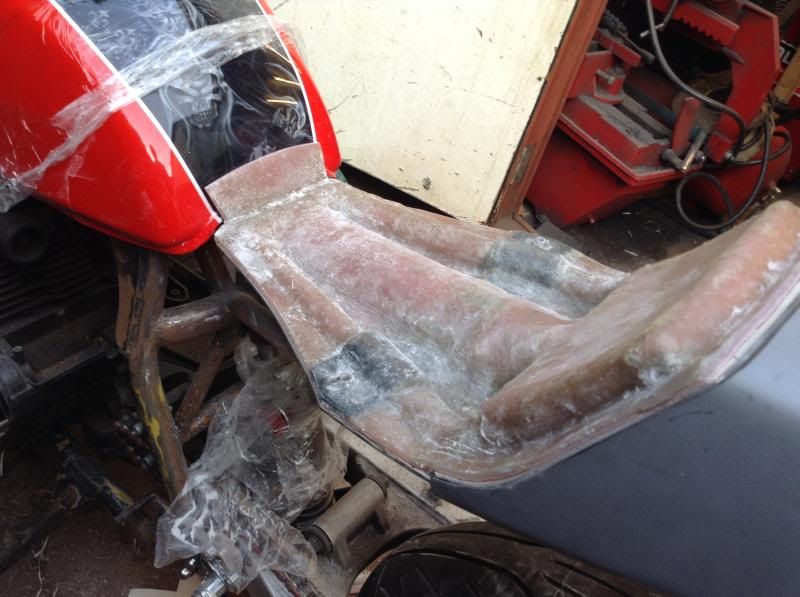 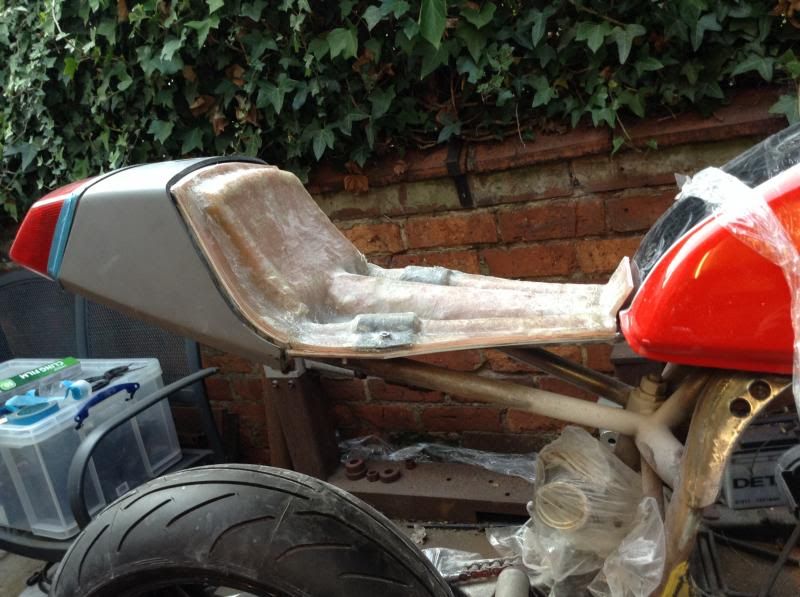 This is the Strangewayz logo from Maureen's sweatshirt on the underside, some of the clingfilm stuck to the resin but hey it did it's job in letting me release the fibreglass pan from the bike. 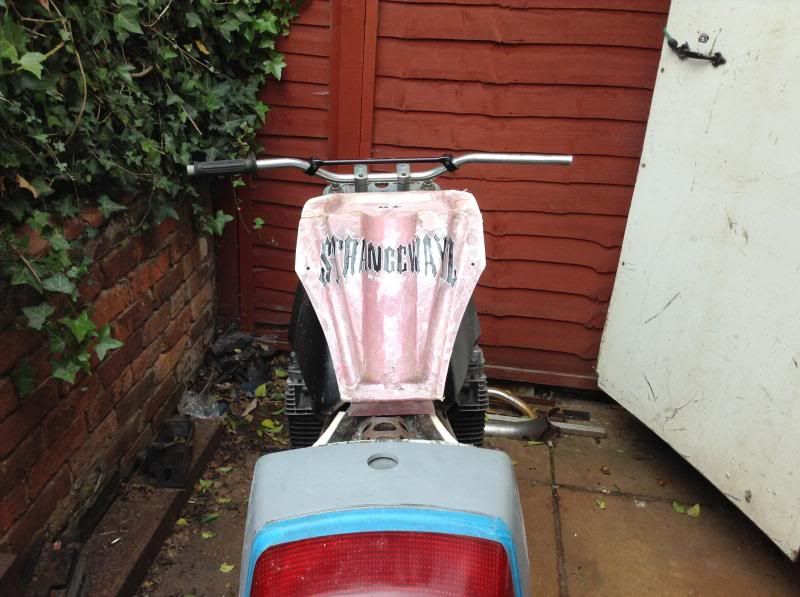 The plastercine did a good job in forming some nice edges. 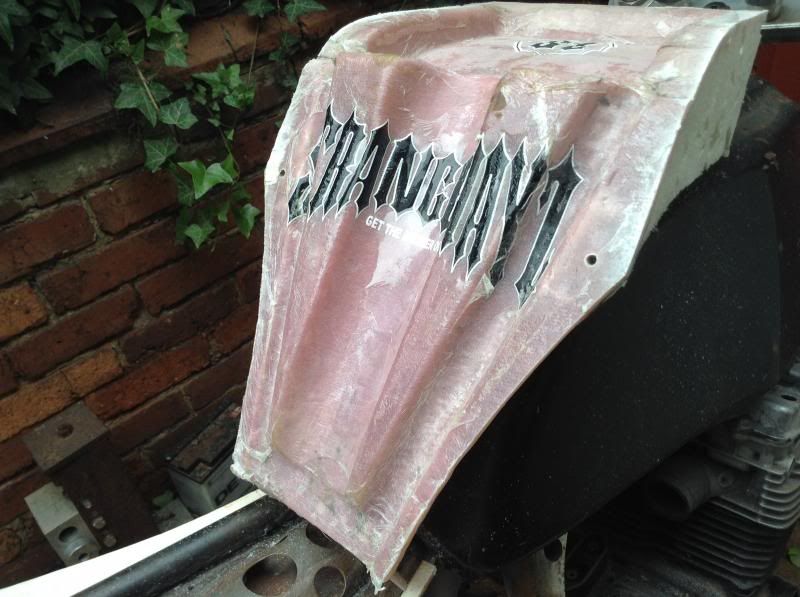 Always good to throw in a Racefit 88 pic.. 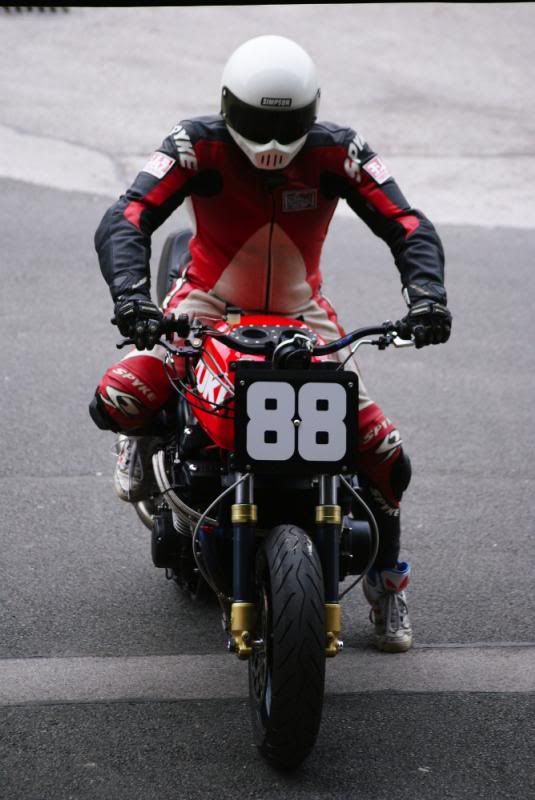 Was after some high density foam for the rear section of the seat so that my tent etc would not compress it too much, this part of the seat will not be sat on so Stevea suggested high density polystyrene which is used for model makinging. Good idea but could not find any quickly in the size I needed without paying 30-40 Queens finest.. Stevea's next suggestion was foam in a can, which I hate having used this for filling gaps around windows, he suggested containing it in a box so ok time to man up... 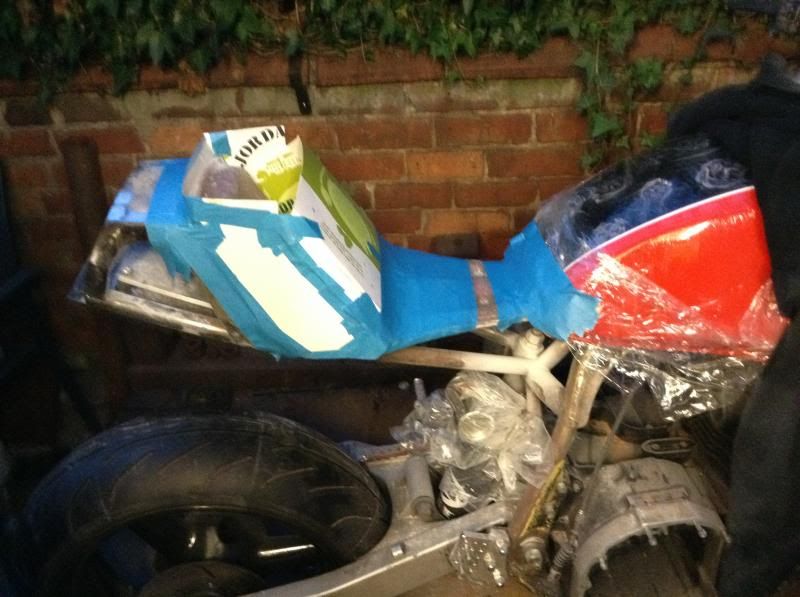 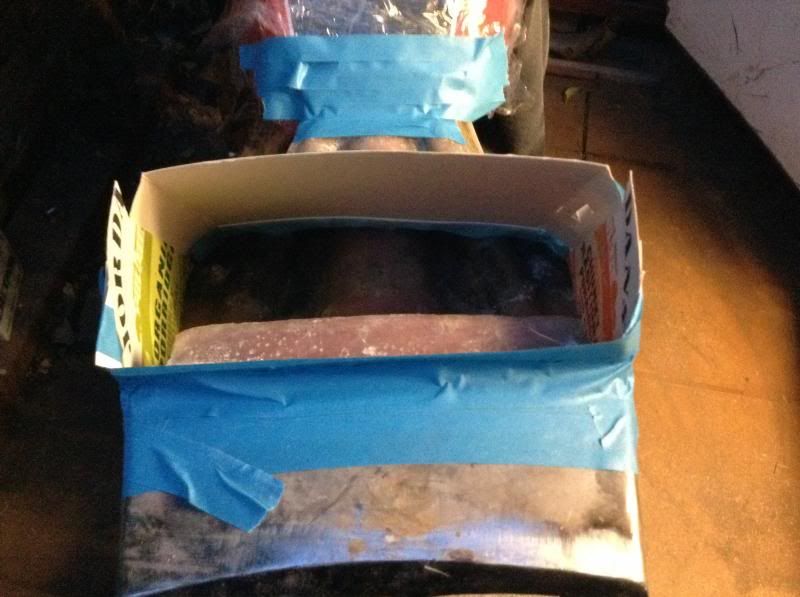 and grow a pair of balls... 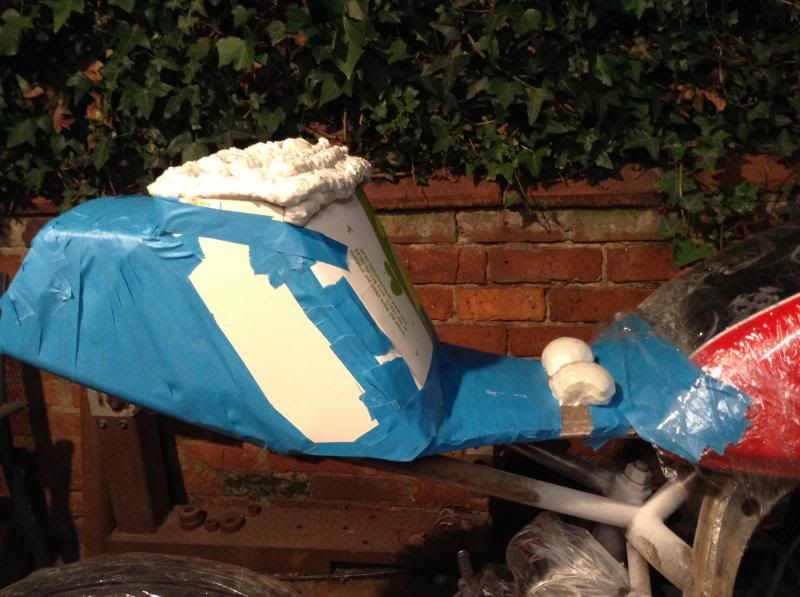 That made me laugh, especially when I had to cut them off, the resident intact Dobermann legged it in case he was next, seat rough shaped, the can blew air instead of foam near the end so have some air bubbles to refill later. 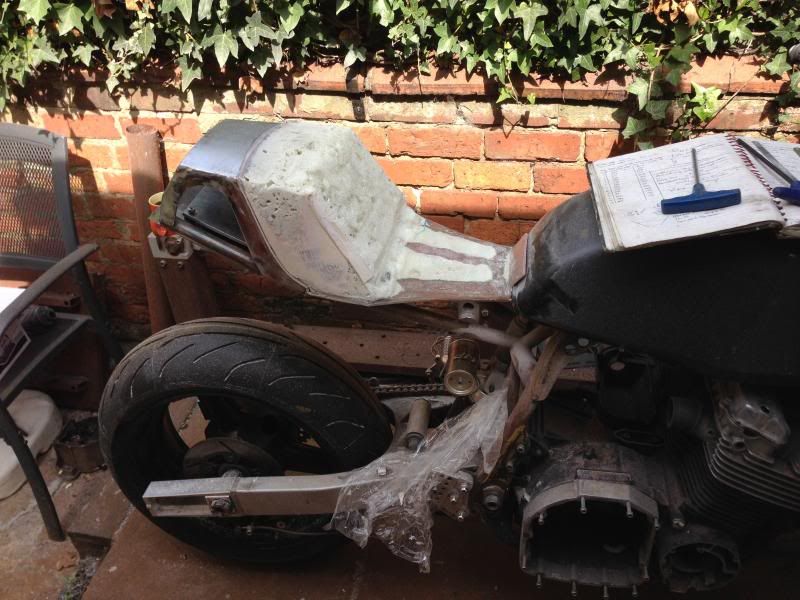 The back top section of the seat doubles as a platform for my Kriega US10 drybag. 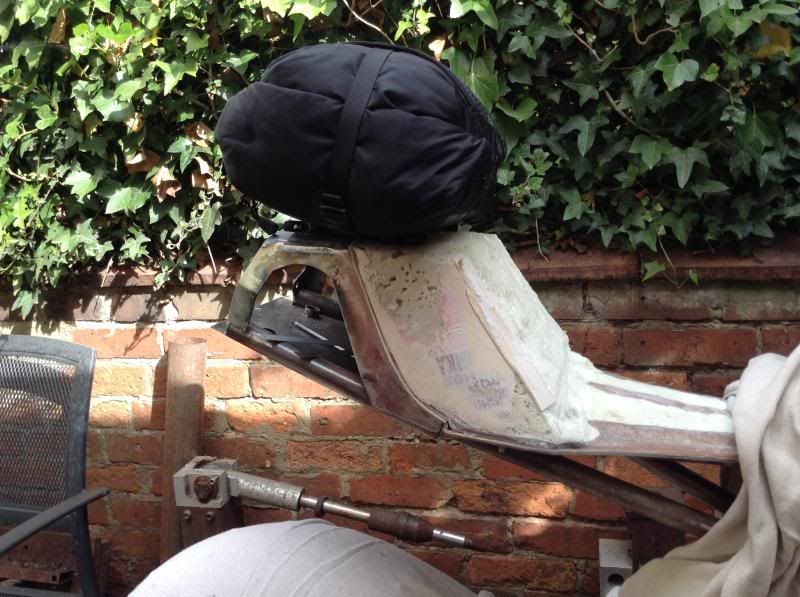 Putting more shape into it. 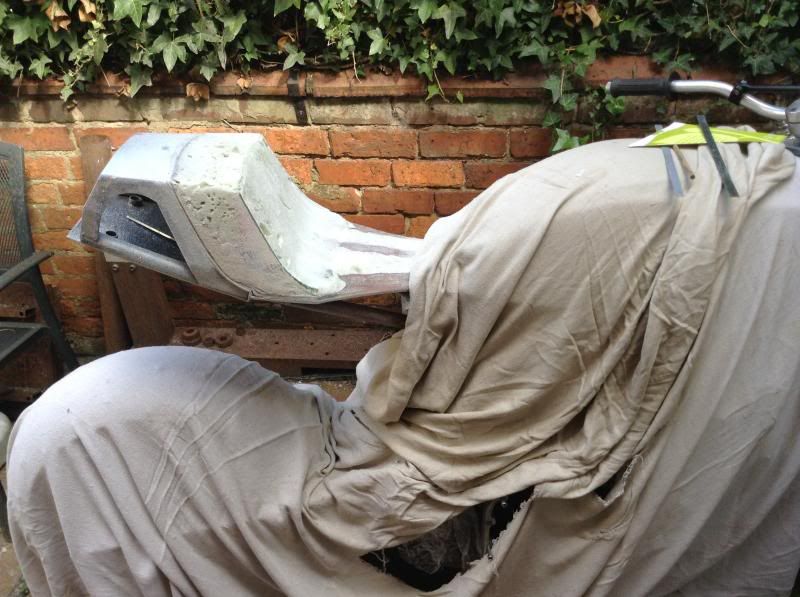 Have a gel pad which I might get Stevea to use with his foam, was actually Mrs Strangewayz which she used on the back of my FJ1200 lowrider which had minimal seating, all the way to Belgium & back for a party one trip, 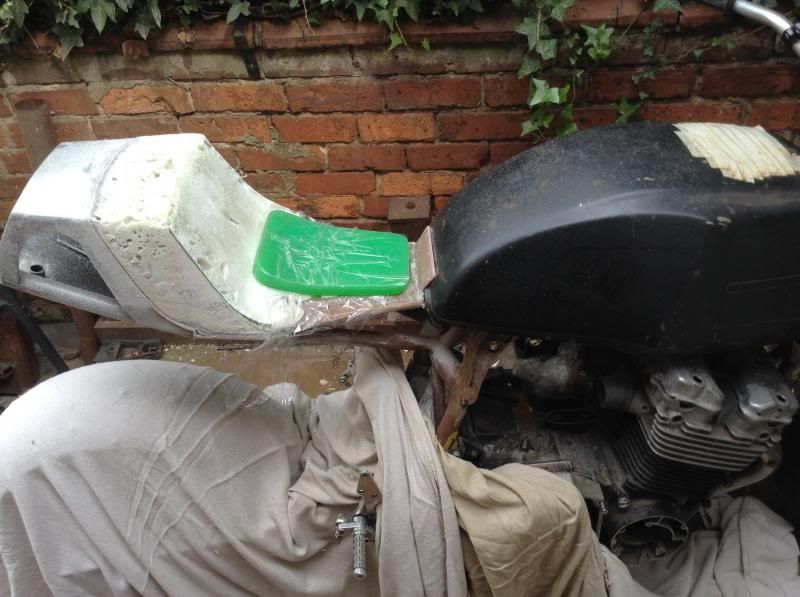 So the foam in a can for the sides & top platform will be covered in 3mm foam to give a good finish, the actual part I sit on will have proper seat foam & probably the gel pad.
|
|
|
|
Post by porky on May 7, 2014 18:51:22 GMT
Top job as always mate ........ beyond the extra mile |
|
quexpress
Velociraptor

Posts: 39  Bikes: 2 X 1980 GSX1100ET, 1985 GV1200, 2000 Valkyrie
|
Post by quexpress on May 7, 2014 23:28:18 GMT
I have bookmarked this build right from the "get go". Each time an update is posted, I can't help but drool all over my keyboard!  IMHO your ET is certainly becoming a piece of art!  |
|
|
|
Post by strangewayz on May 8, 2014 13:52:16 GMT
20Big news today is that Super sent me a pic last night saying "you have brakes"... collected after work not getting home till way after midnight but got to do what you have to do.. 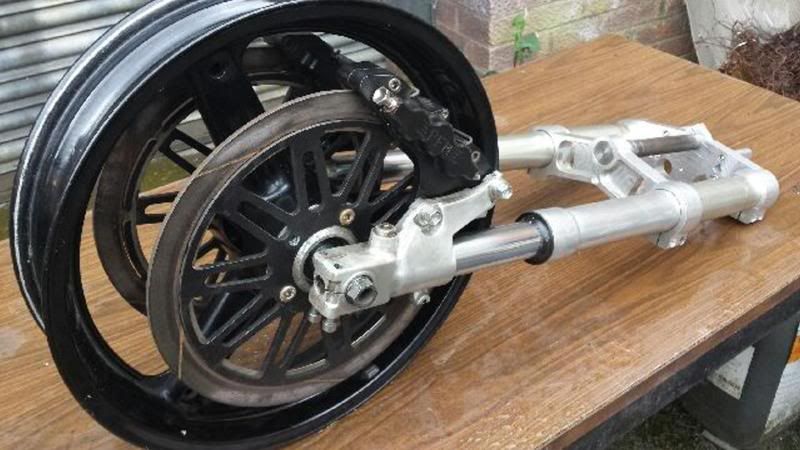 Postie dropped this through the door this morning, brake lines... 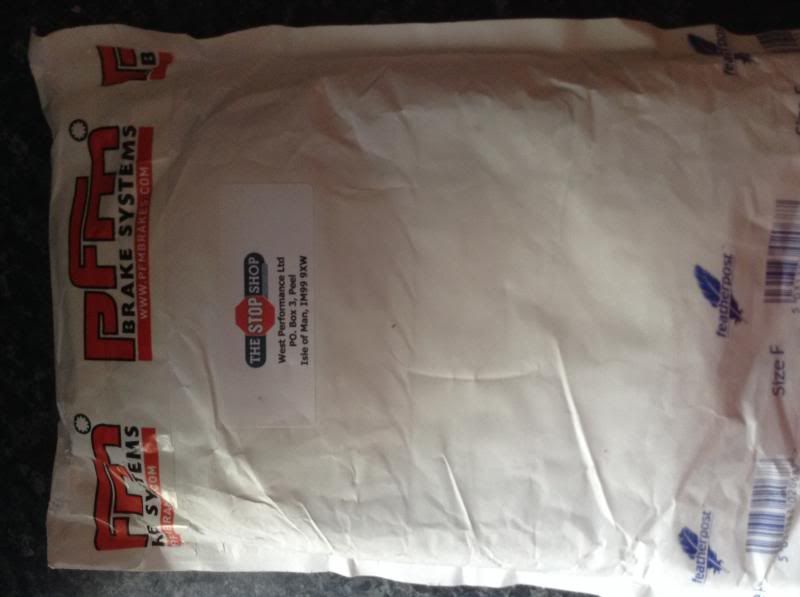 The calipers had been 3-4mm out from being able to bolt up, I had suggested to Super that maybe he could tap the holes in the fork leg, screw in a plug, mill it flush & then drill out new mounting holes. Sounded good in principle but the maths had to stack up for safety reasons. 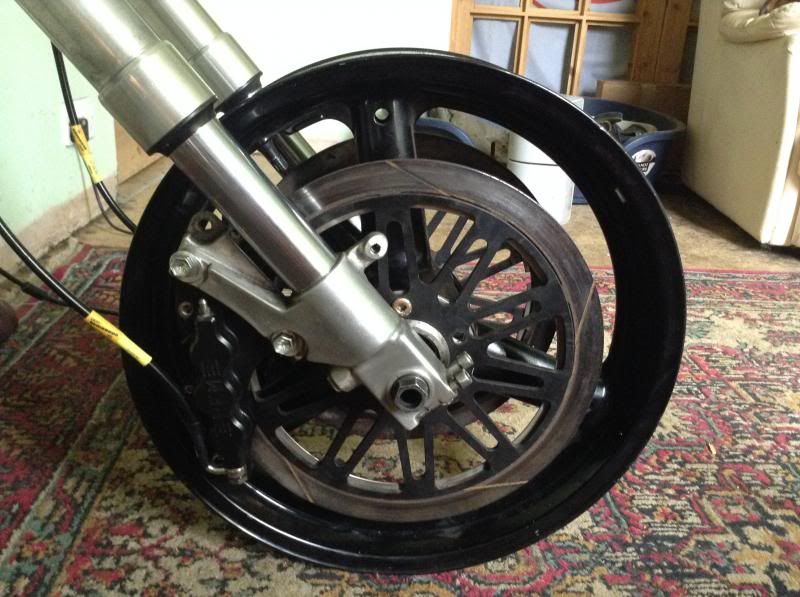 Very subtle & maybe if I had not told you a lot of people probably would not notice. 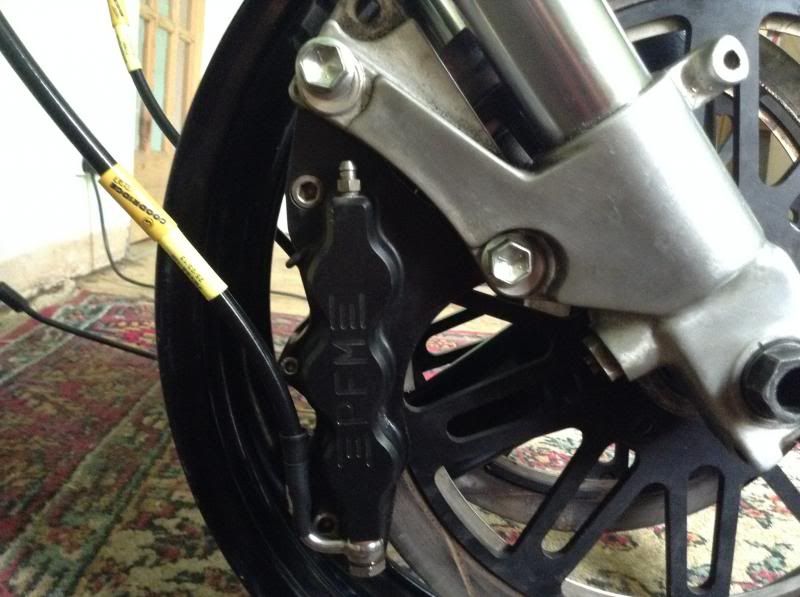 Yolk was already pocketed underneath, this shows the slots Super did at the weekend for the brake lines & also speedo cable. 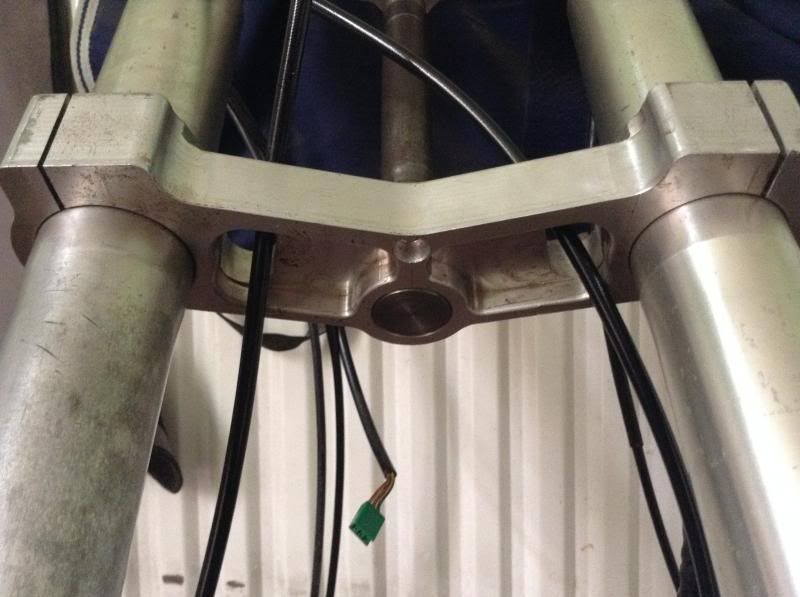 Shift light & ignition switch holes were from the original design Sam did a few years back. 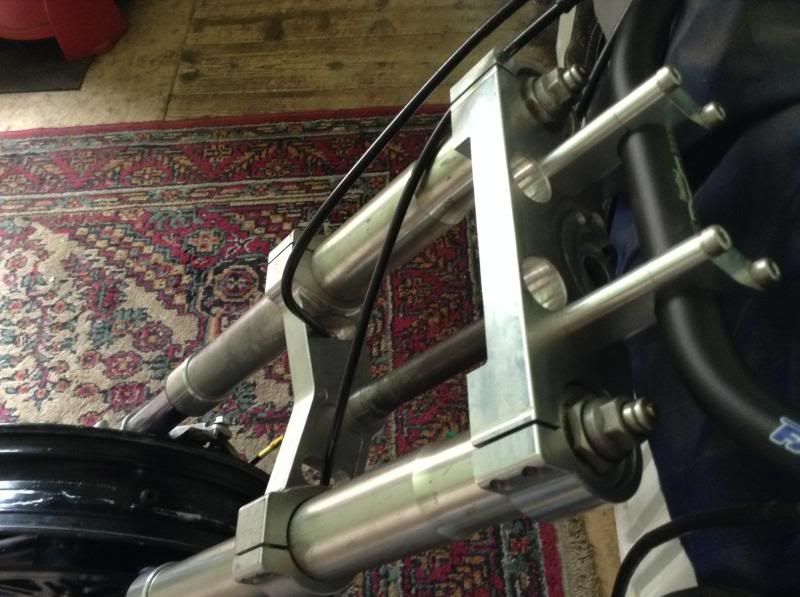 Good progress there but not nice outside, this is where I suffer with no garage, do have an awning I can wind out but still cold & wet.  Cut out the worst air bubble section in the seat foam (where the can started to run out) & refilled, did not need to take that much out as the main structure looked good. Booked in to take the bike to Stevea's unit on Monday morning for proper seat foam etc, should get some good pics. 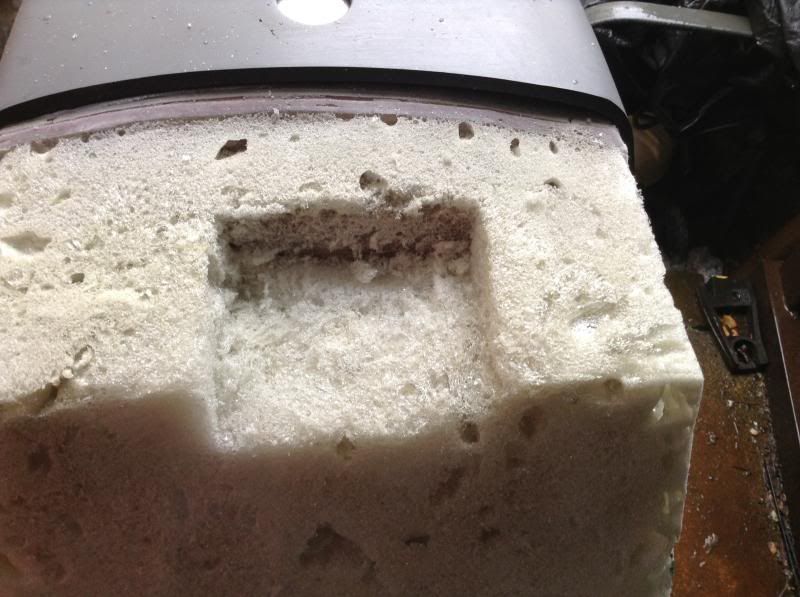 Also collected offset sprocket from Super last night, made from 530 to sit on the splines & a 17th 520 to drive the chain, this picture shows the 'sprocket' pieces pressed together, I need also to weld them. 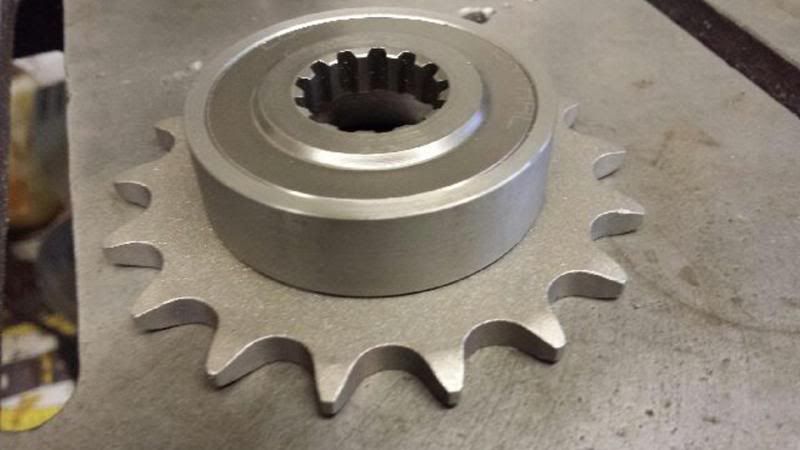 My 520 chain had not arrived by the time I left for work so I did a quick mock up with the 530 chain to show the clearance issues that I've had to balance. First picture also shows nicely how much wider the 530 chain is across the roller than the 520 sprocket, I'm not expecting to save much width on the side plate thickness o/x ring structure but if the 530 clears then the 520 should as well. Swingarm to chain pins first.  Shite picture showing chain to tyre clearance with a 190 tyre.  Tight but I'll find out for real what works & what doesn't when it's rolling !! Lastly Oz wanted his own section... he has actually been to an OSS party... tried to shag Deeds  
|
|
stuntmonkee
Oviraptor
Posts: 4
|
Post by stuntmonkee on May 8, 2014 18:44:13 GMT
Looking great - done anymore on the EFE?
|
|
|
|
Post by bluedog59 on May 8, 2014 22:19:13 GMT
Looking great - done anymore on the EFE? Give the bloke a chance ! If he goes any faster, he'll catch his own ar*e up.  Best solution on the brakes, far better than plates Maybe you could knock up some new billet fork lowers when you get back ? When you've got a mo like. |
|
|
|
Post by strangewayz on May 9, 2014 14:20:13 GMT
19EFE I hear you  Postie delivered 520 today... from B&C Express.  Picture does not do this justice, sexy chain & sprocket combo. 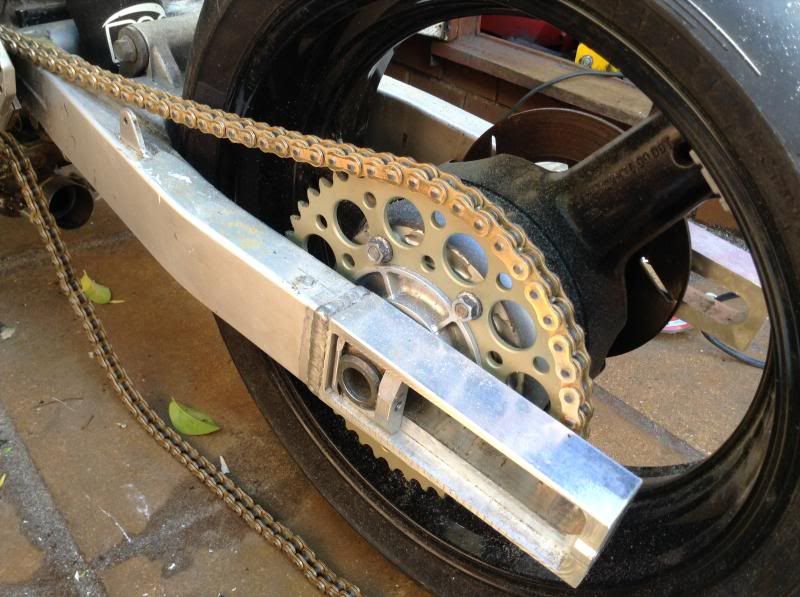 520 Chain pin to arm clearance. 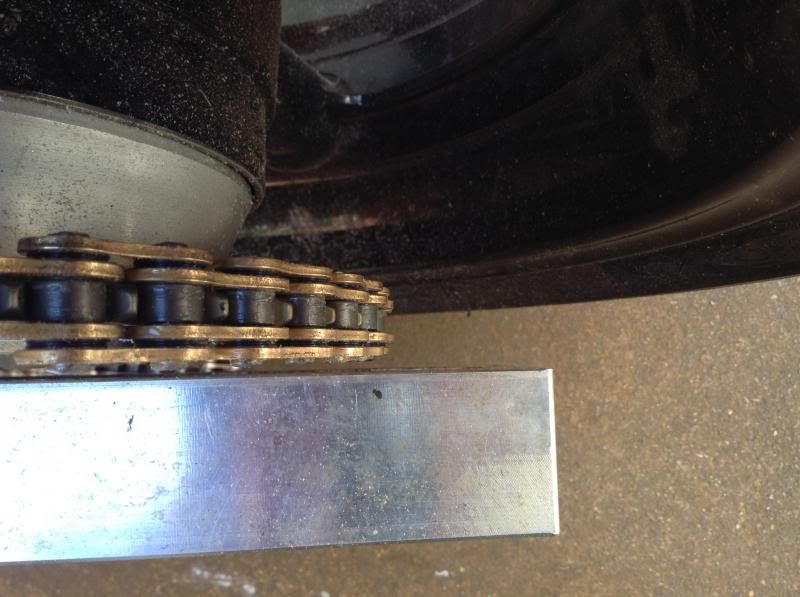 520 Chain to 190 tyre clearance. 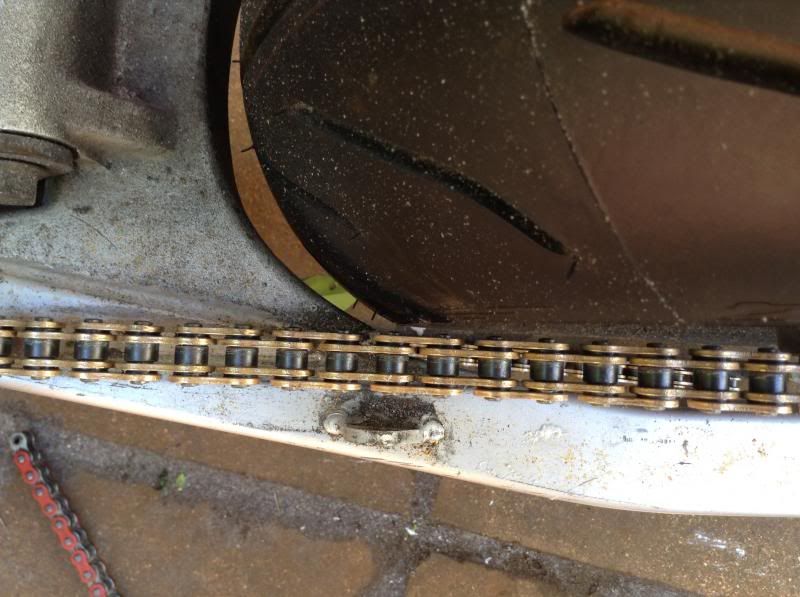 520 on the left, 530 on the right showing where you gain with the reduced width. 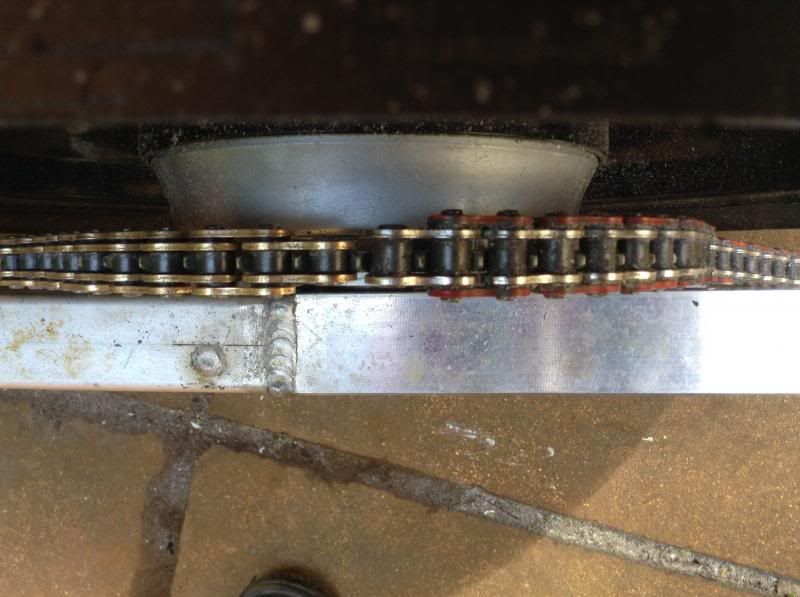 As I suspected gain very little if anything in the side plates x/o ring structure. Grabbed this off the internet so use it as a guide, might not be 100% accurate & I'll add a few words in case it helps anyone out. Chain Pitch Width Roller Diameter 520 15.88mm 6.35mm 10.16mm 525 15.88mm 7.85mm 10.16mm 530 15.88mm 9.53mm 10.16mm 532 15.88mm 9.53mm 11.10mm 630 19.05mm 9.53mm 11.91mm 632 19.05mm 9.66mm 12.68mm Table does not show the overall external pin to pin dimensions, I will check mine & edit this when I get home. If you are sticking a bigger rear wheel & tyre combo in your dino then starting with a 520 to work out all the clearances wins you approx 4mm over using a 530. The 520 is the same pitch as 530 so whatever 530 sprocket sizes you were going to use will be the same in 520, for example I was going to use 530 17/48 & still ordered the same sizes 17/48 just in 520.. although of course Super Larry machined me an offset front sprocket but it was still a 17 tooth 520 as the chain drive part. Where things complicate slightly is if you already had that bigger wheel fitted using a 530 & wanted to try the smaller 520 to solve either a chain hitting tyre or chain hitting frame issue. Just changing the sprockets & chain to 520 & no other work might solve the chain to frame issue but will probably not a chain to tyre issue. Reason being is that the inside faces of the sprockets will still mate up against the same surfaces that the 530's did & as you can see from the picture you won't save much on the 'inside' (tyre side) because the side plates are very similar. You save room on the outside which is why you might stop hitting your frame. To solve a chain / tyre issue you would need to space out the sprockets taking advantge of the approx 4mm extra room you have to play with. Hope that made some sense ! This is the foam in a can that I have been using to sculpt the rear of the seat. 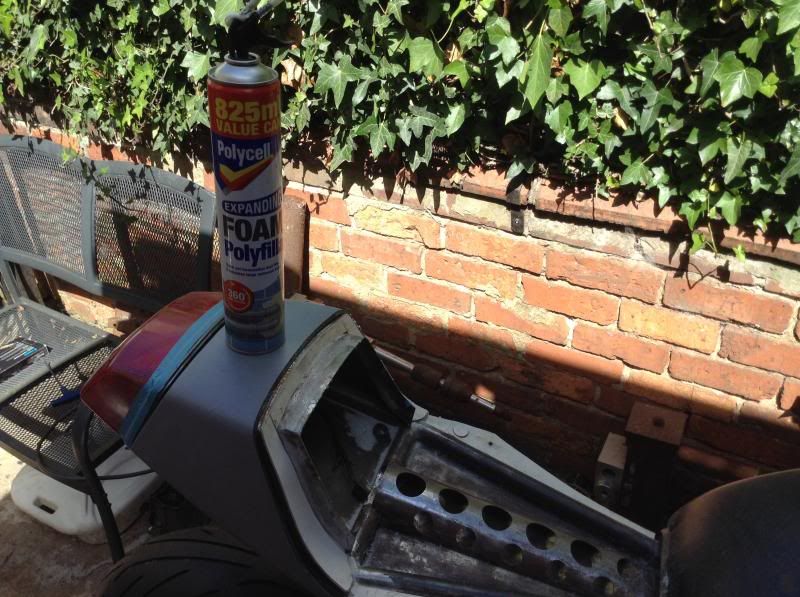 Tool I have used for smoothing the foam, also been using a very worn flap disc in a grinder, good because it is curved, an orbital sander with flat sanding sheets & a good old hand file. 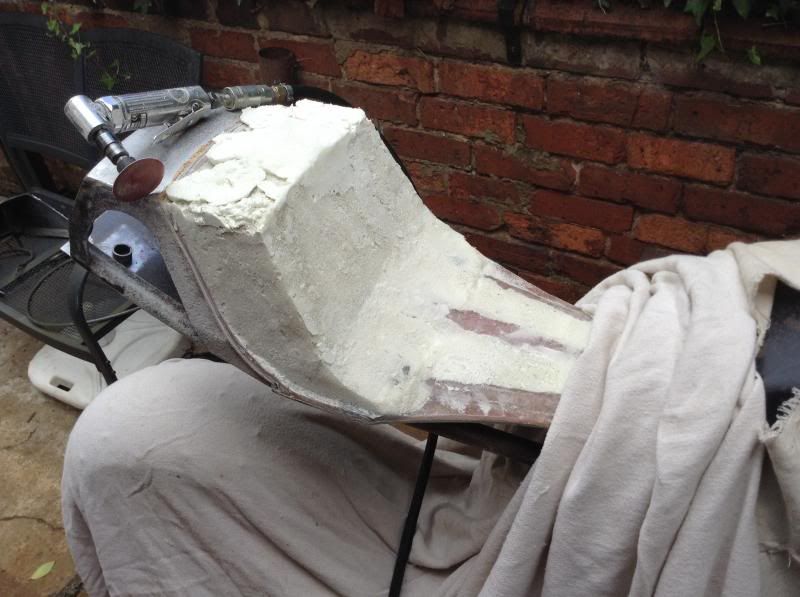 Looking good, the foam has also age hardened which is a benefit to me as I wanted a harder area for luggage reasons. 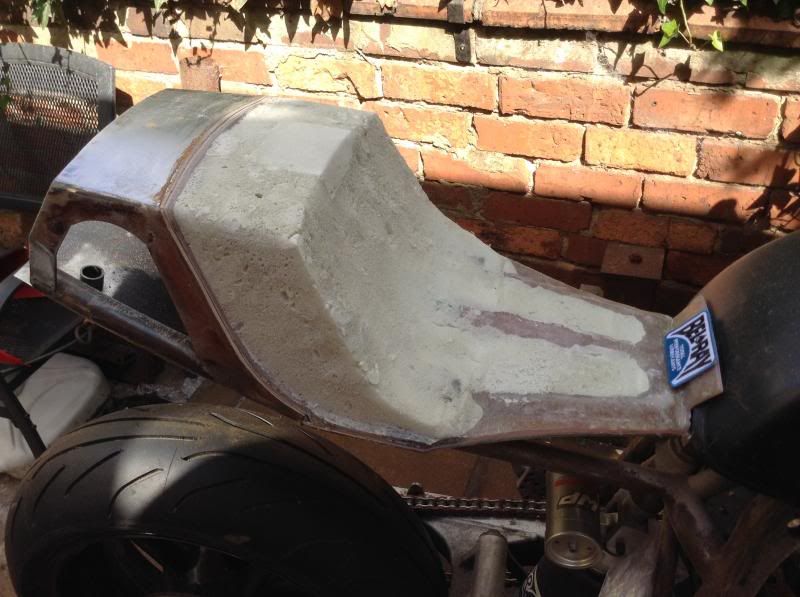 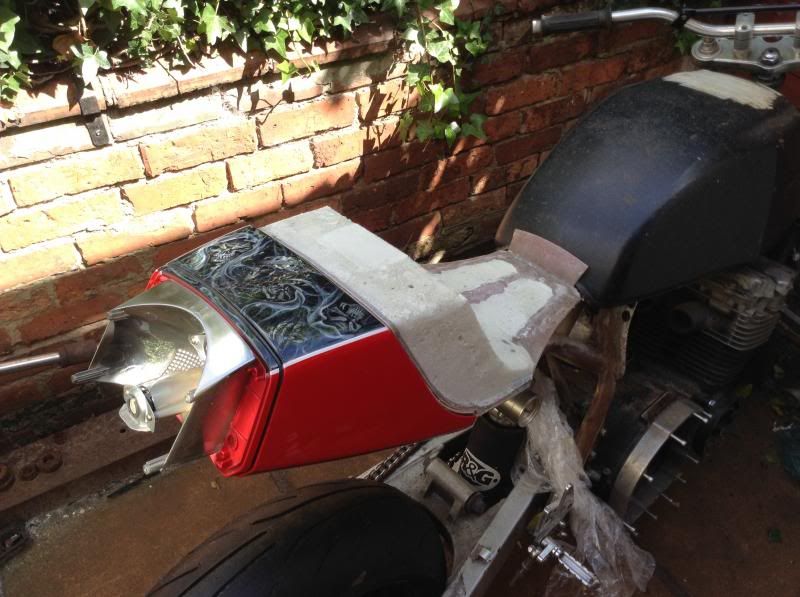 Looking good from the back, you can just see the white of the foam above the black painted section of the tail piece to indicate that the curve I have made in the seat is close to matching.  Needed to finish the seat foam today so I can strip it back down to a bare frame & spend Sat + Sun doing some final welding & hopefully the last bits of frame fabrication.
|
|
|
|
Post by strangewayz on May 10, 2014 20:53:56 GMT
18Ended up doing a bit of running around today & checking a few things out, need to catch up on welding tomorrow ! Whilst machining was done on my forks / yolks I had a spare front end in the 711, as I am taking this to Stevea Monday morning I wanted to have the correct front end in so the bike will be at the correct height. Needed to go & get a tyre fitted, before that I found that one of the PFM discs had accumulated some rust (being cast iron) & had stopped floating on the carrier, spent time cleaning that up but if I hadn't done it today it would have been on the list for later ! New bottom taper roller which to fit the slingy stem into the GSX750ET frame just uses the normal 32006x (30x55x17mm) bottom bearing. 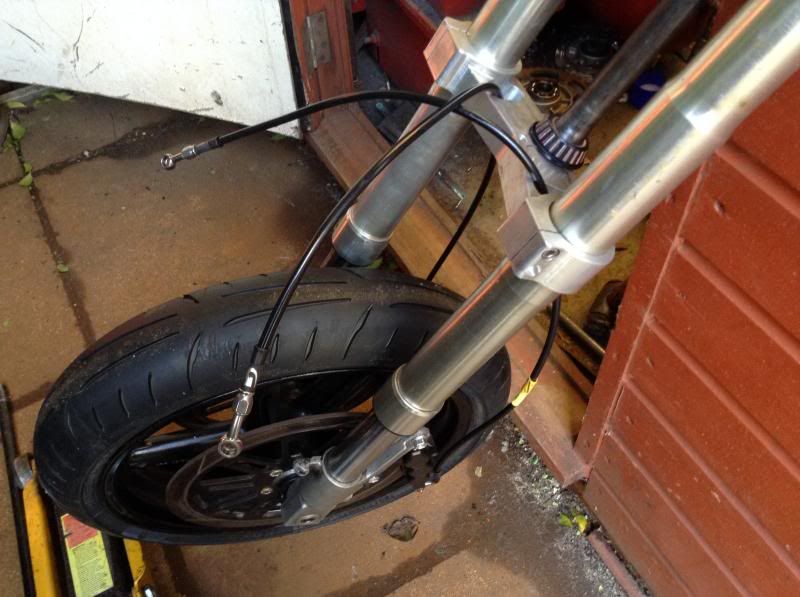 Talking bearings... a lot will know this anyway but as this site is about sharing info this may help someone else... mix & matching wheels & forks or swingarms can often involve a mismatch in bearing & spindle sizes... ways round that can be sleeving down bearings or working out what size bearings would fit the wheel & spindle & getting them if possible. Now days that couldn't be easier with a lot of the online bearing supplies have search engines on their websites where you input : Inside diameter (id) Outside diameter (od) Width Using my Hayabusa front wheel into Slingshot forks as an example : Hayabusa front wheel bearing in my case was 25mm id 52mm od 15mm width. Slingshot spindle was 20mm meaning the new bearing size I was after was 20mm id 52mm od 15mm width. Get the bearing reference off the website & then hunt around for the best price for a quality brand. You can work out any seals you need by a similar method. When I was slimming the sprocket carrier down I could not seem to find a smaller width bearing than the stock 32-65-17 the the Hayabusa sprocket carrier used, which is why I had Super Larry recess the bearing instead, but I used a similar method to search what was available. First time the Busa wheel has been in the 711 !! Another pic showing the slots in the bottom yolk working. 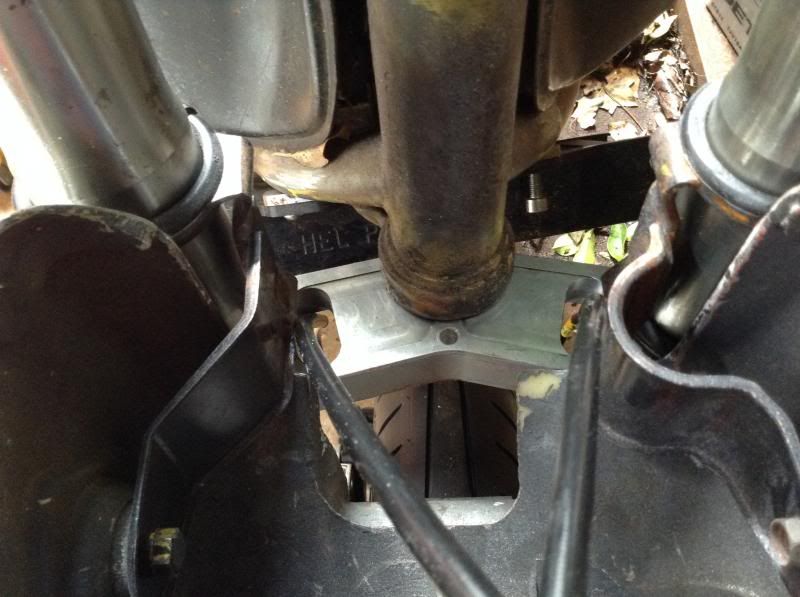 Using a twin cable throttle setup from an early GS1000, like the oldskool metal switchgear. 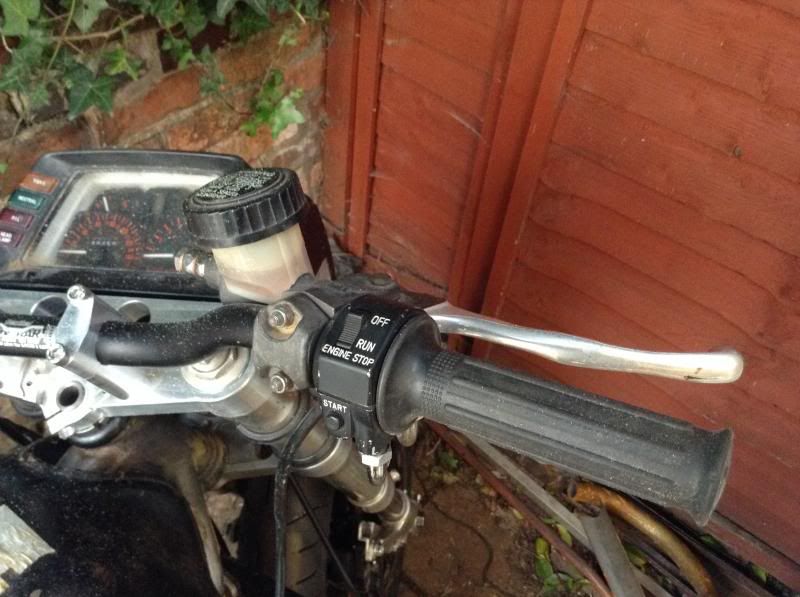 At first I did think the cables were going to be too long meaning more expense but think I found a way to route them today to loose the extra length. Those cables & the twin brake lines seem to work nicely in the gap between the clock cover & the forkleg. The headlamp cowl brackets are stock GSX ET ones that I welded larger rings top & bottom so they would work with usd's. I also shortened them in height & repositioned the headlamp shroud mount so that I could get the EFE clock cover flush with the top of the top yolk. All the details from that were on the old OOS site.. 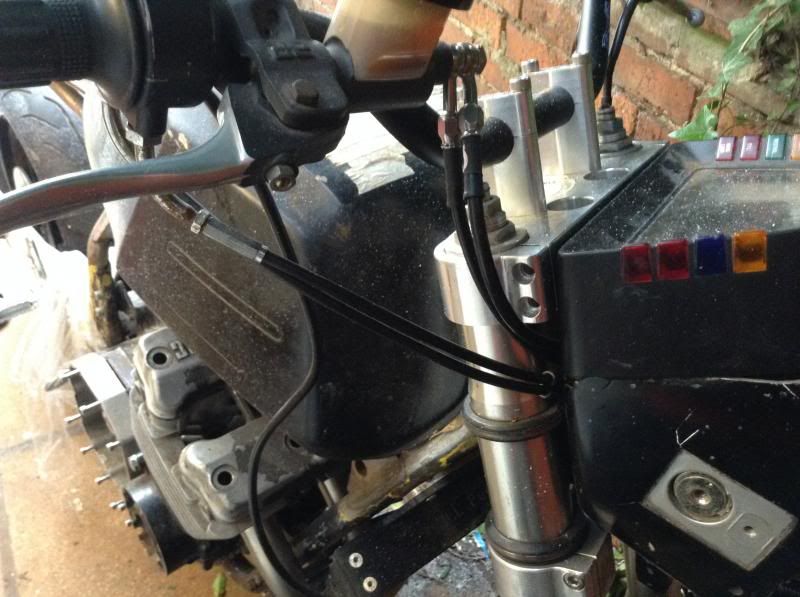 Took too much time measuring & hunting on the internet a speedo cable that would work with slingshot speedo drive & EFE speedo that was an ok length. Seems that GSXR1100W's are almost the exact length I need so one ordered up. 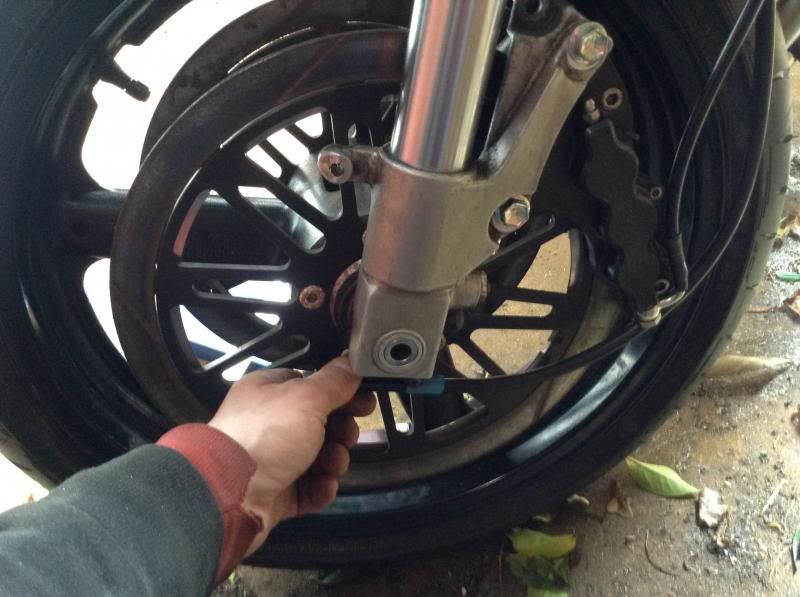 Did the last bits I needed to on the seat & removed the card layers from the frame that I had used when laying up the fibreglass to provide a gap for the seat fabric to go under the lip, here you can see that it did work. 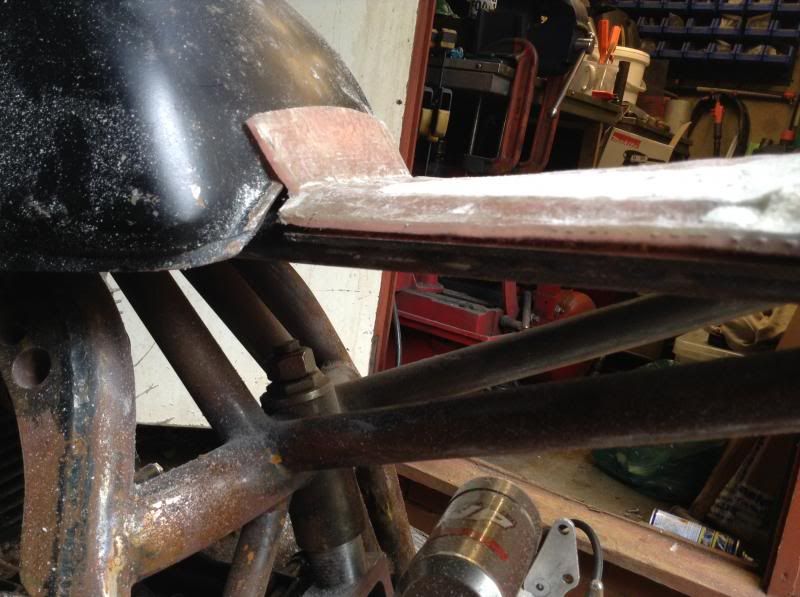 Before stripping the frame down for welding I need to look at the steering damper mount. GSXRSam had made the top yolk to have my GPR steering damper fitted in it. You can just about see in the shite pic on the masking tape left hand side is a typical GPR frame mounting which is designed to clamp the tab the exits rearward on the GPR damper. I have no room for such a thing so had Super Larry recreate the clamp section out of steel which you can see on the right. I need to cut that to size & profile the bottom to fit over the frame top tube & then weld it in place. There is not a lot of room between the headstock & the tank for this to fit but it is doable. 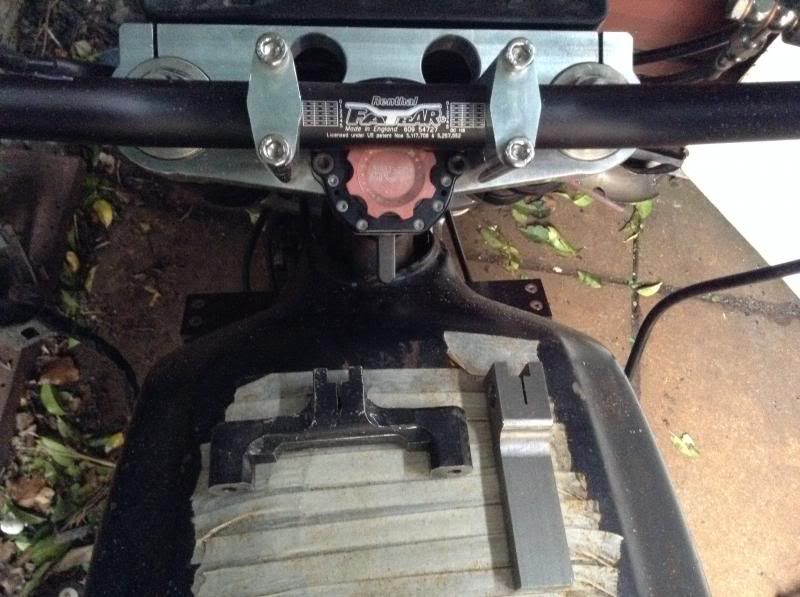 and as they say tomorrow is another day...
|
|
|
|
Post by strangewayz on May 11, 2014 23:19:29 GMT
17Early start today, would have been nice if cow girl woke me up... I would have been smiling  Workshop looked like a bomb had landed due to all the mess from seat making, cleared all that up & did a session on the lathe, Super Larry had reworked the ends of an old torque arm I had & it was just left for me to size them to the alloy tube that I had bought, which also need facing off... 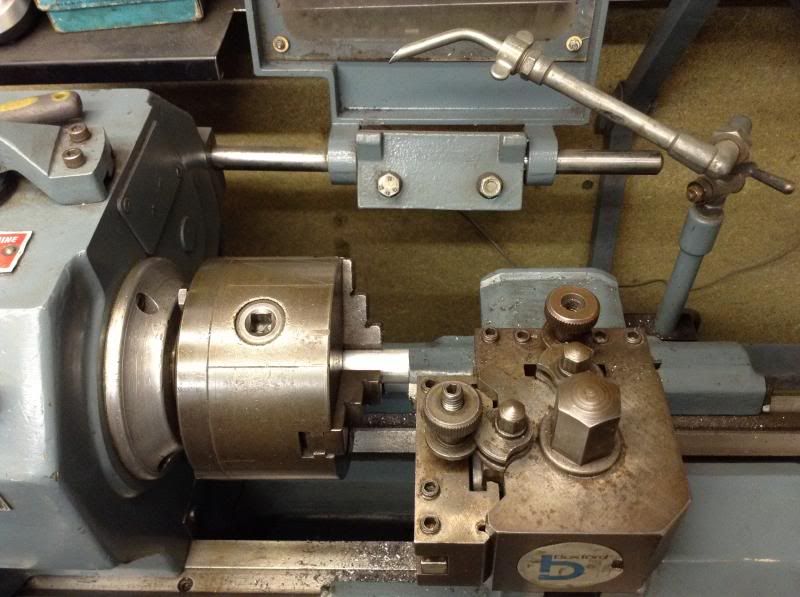 Got a good plan for this but early stages here, purposely left a gap to show that the rod end does fit in the tube to seal the end... 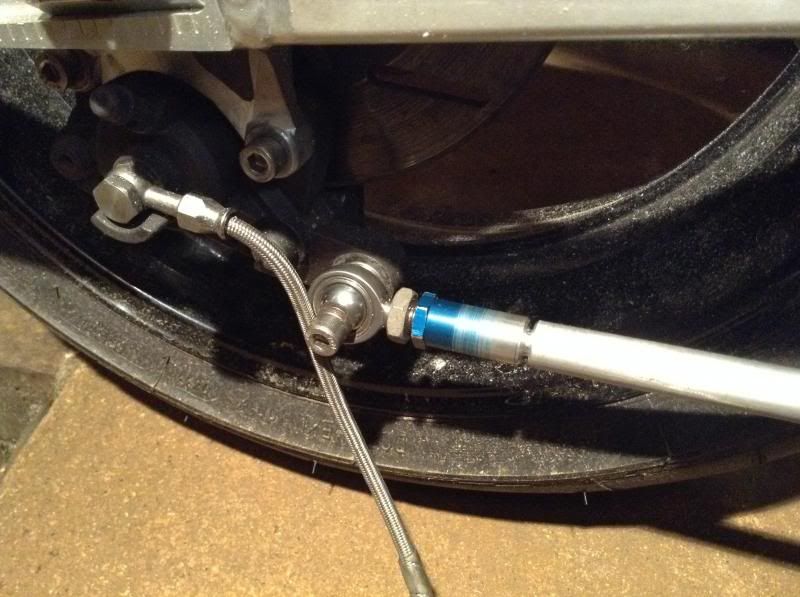 Next was onto the steering damper, needed to adjust the stem as it was sticking just proud of the top yolk. 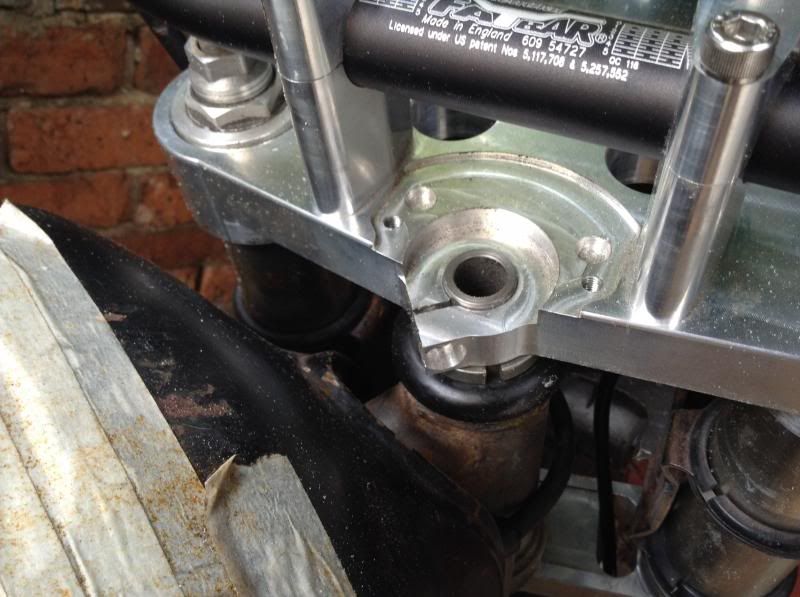 Had a quick measure & turned up a small tube on the lathe to act as a guide to grind / file down to. 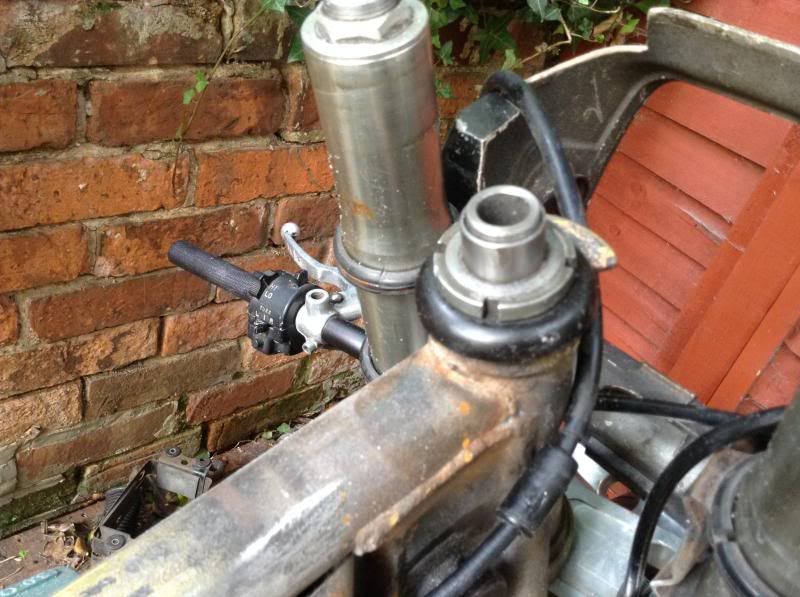 Yeah not as good as pressing the stem out & turning ti down in the lathe but worked real good. 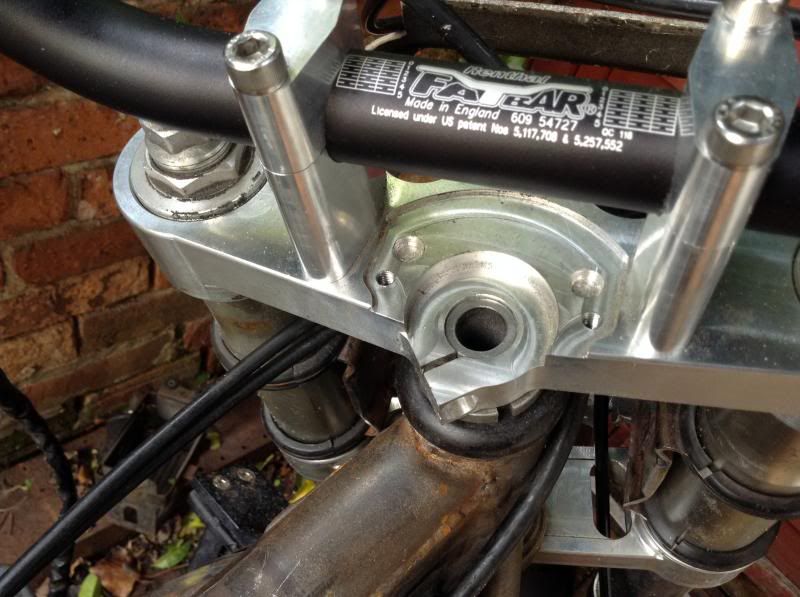 That done could bolt the GPR steering damper in place correctly. 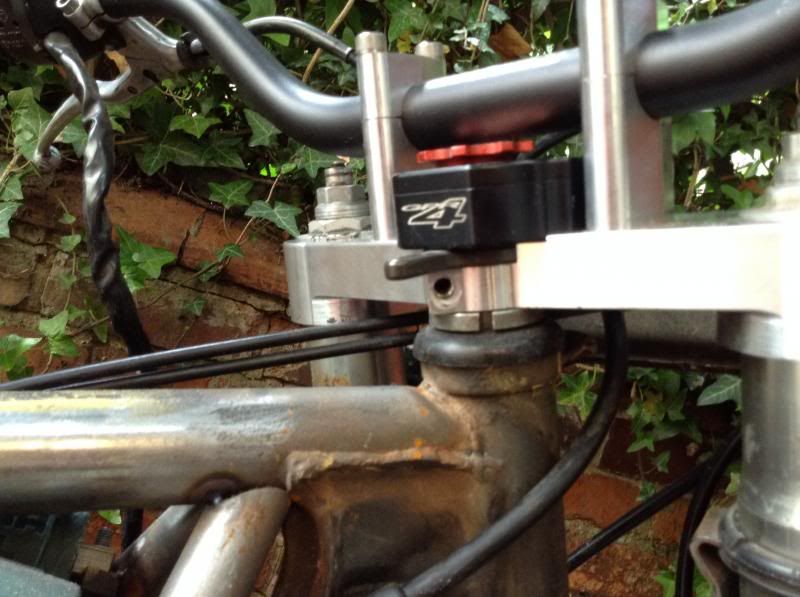 Good progress at this point & then it bust my balls all afternoon & evening  I always knew this was going to be a tight fit & that the piece Super Larry had made would need to be shaped, here is the problem.. no petrol tank clearance, this was my spare tank as I thought that would be safer to mess about with. 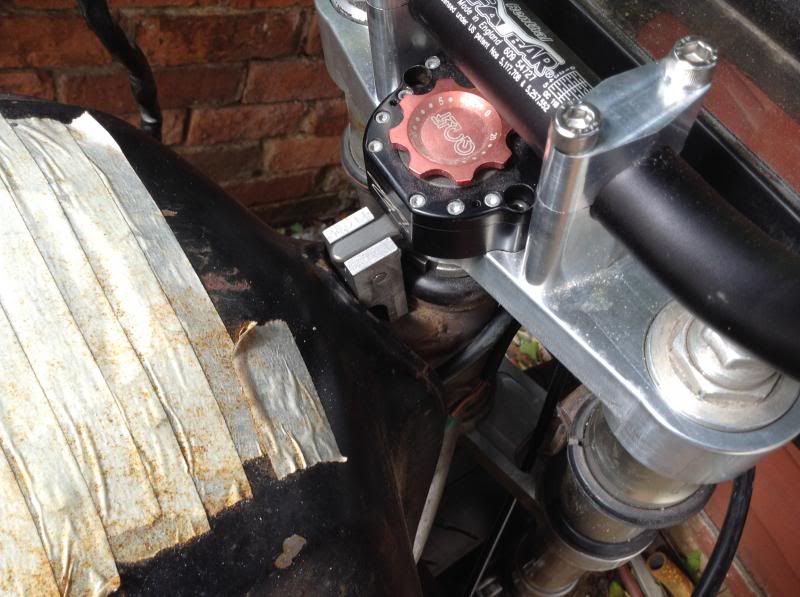 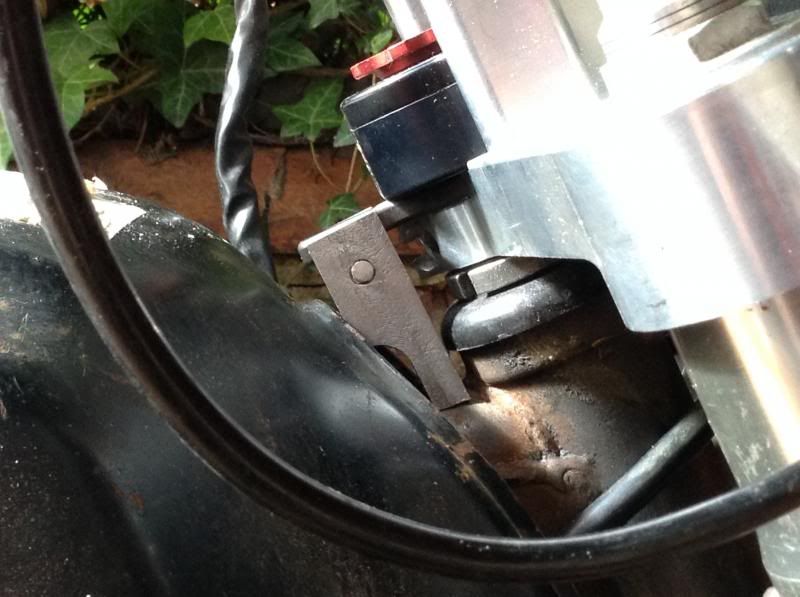 Reshaped & actually looking like it will work. 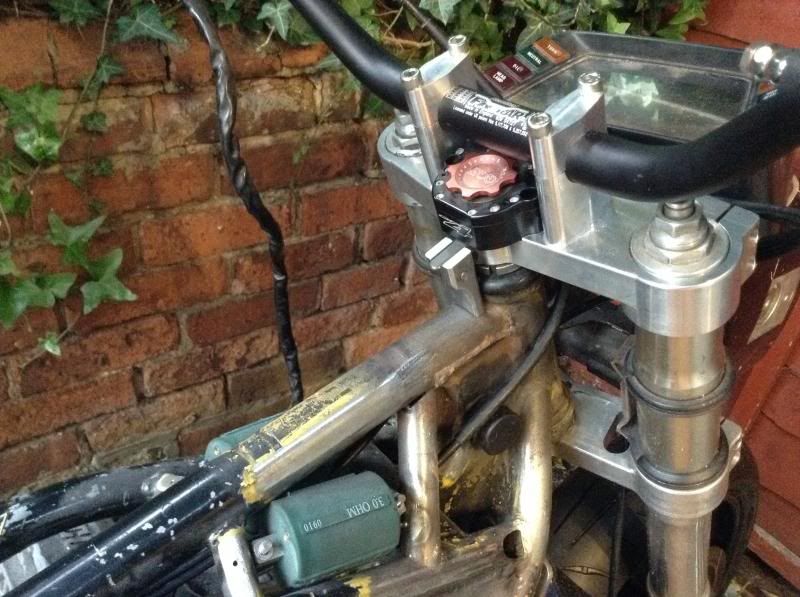 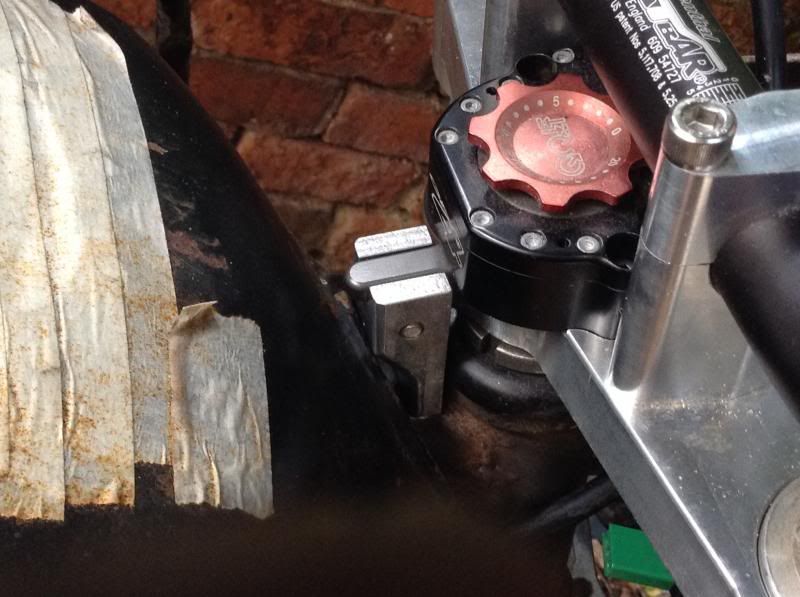 Can't tell you how many times the tank was on & off, piece reshaped etc... but just before I tac welded in place thought it would be sensible to test with the proper tank. Slightly different shape right at the front & no longer fits, can't even get the tank on properly here.. 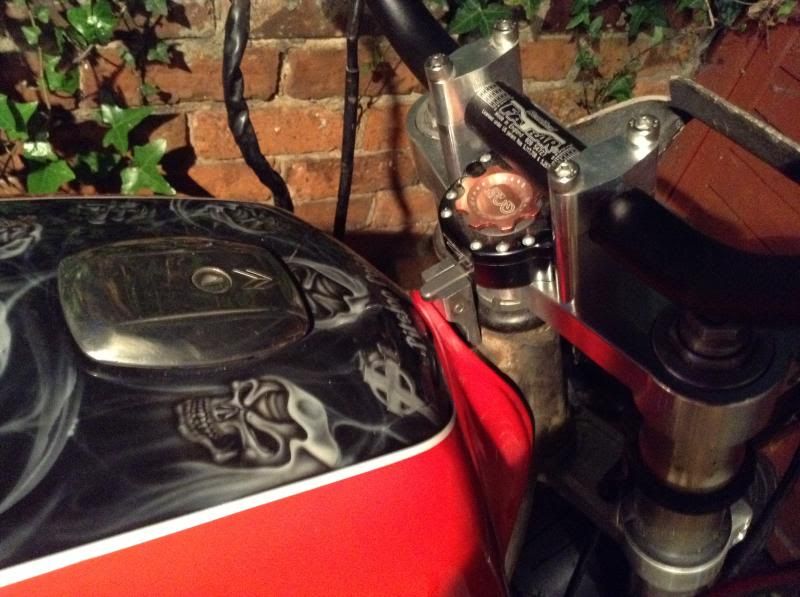 Last major rework of piece before I called it a day.. which was a winner. 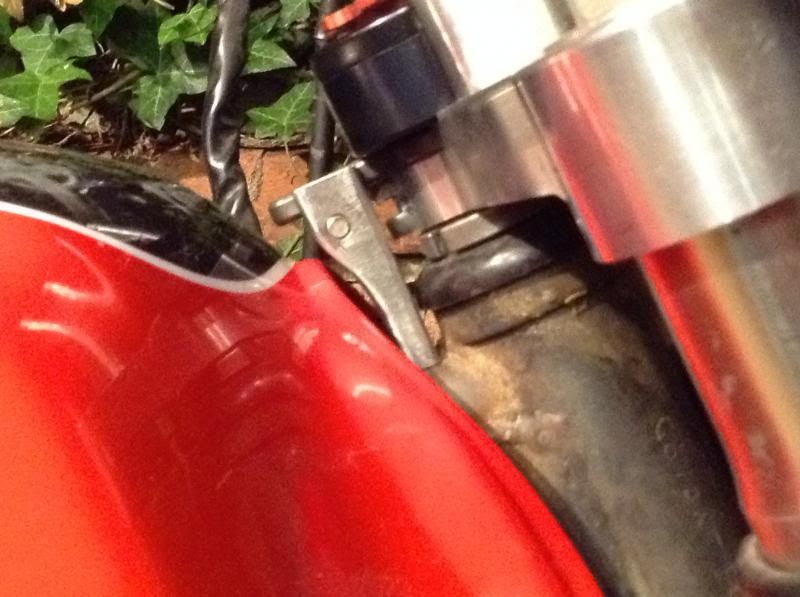 Tac welded in place & tested, works really well, as said bust my balls all day but was worth it in the end ! 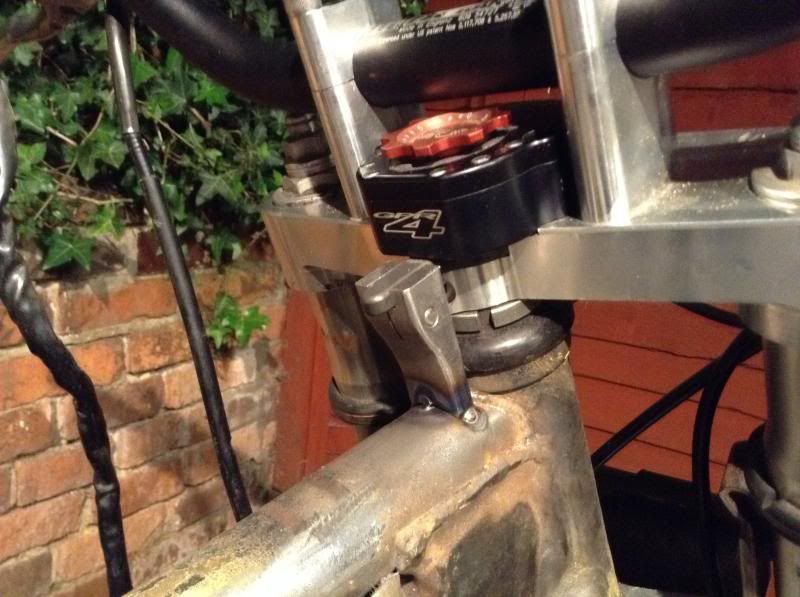 Another early start tomorrow (Monday) as need to take it to bits to get through the house, load van & go to see Stevea for seat foam.
|
|


 of course move the sprocket inbound too much & the chain contacts the tyre.


